Fix Veneer Bubbles on a Mid-Century Teak Coffee Table Safely
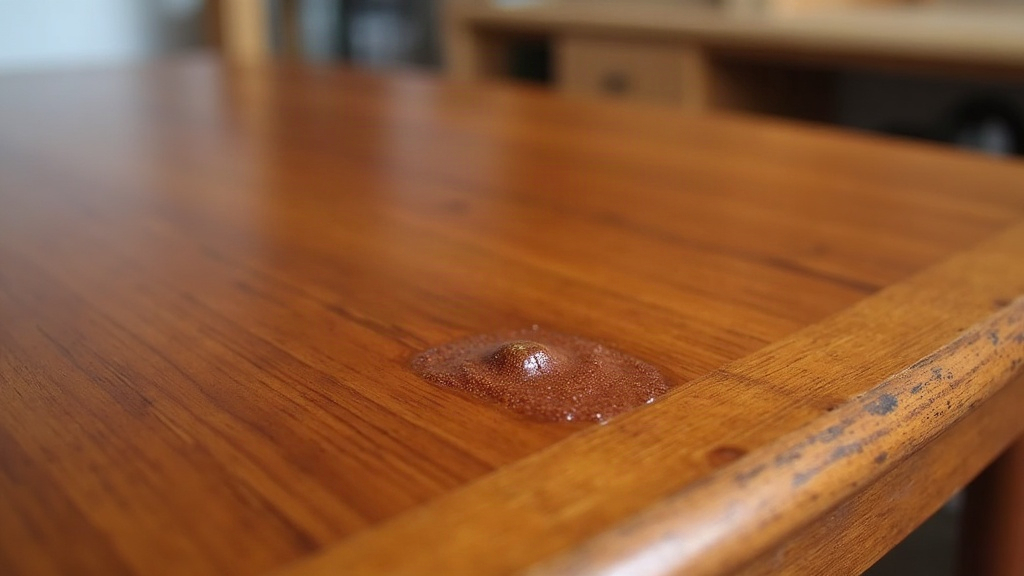
Fixing Veneer Bubbles on a Mid-Century Teak Coffee Table
Patching up a bubble in the veneer of an old teak coffee table isn’t a job you rush. It’s slow, fiddly work, and brute force will ruin it faster than almost anything else. The whole point is to get that lifted veneer glued back down without disturbing the original teak oil or lacquer finish. Sand through 60 years of patina on a genuine mid-century piece and that character is gone for good, no getting it back. The good news: with the right heat, the right glue, and a bit of clamping patience, most bubbles disappear in an afternoon without leaving a trace.
Why Veneer Bubbles Happen
Teak furniture from this era was usually built with thin veneer sheets glued down with hide glue, or sometimes an early synthetic adhesive. Fifty, sixty, seventy years later, that bond starts to give out for a handful of reasons:
- Humidity swings. The substrate and the veneer expand and contract at different rates as moisture levels shift season to season. Eventually the glue bond just snaps.
- Old hide glue failure. Original adhesives get brittle and lose their grip over the decades, especially after repeated heat exposure.
- Heat damage. A hot coffee mug left too long, direct sun through a window, a lamp sitting right on the surface. Any of these can cook the glue underneath without leaving an obvious mark up top.
- Impact damage. One hard knock and the bond shears locally, even though the finish on top still looks perfectly fine.
Small bubbles, dime to quarter sized, are the ones worth tackling yourself. If you’re looking at a large delaminated patch or veneer that’s actually cracked, hand it to a professional restorer. That’s not a DIY afternoon anymore.
Tools and Materials You’ll Need
- A small syringe with a fine needle, for injecting glue
- Yellow carpenter’s wood glue (skip hide glue unless you’re matching the original construction) or a veneer-specific adhesive
- A sharp craft knife or veneer saw
- A household iron and a damp cloth
- Wax paper or parchment paper
- A flat caul (a small block of wood) plus clamps, or just a stack of heavy books
- Fine-grit sandpaper, 400-600 grit, for touch-ups only
- Matching teak oil or finish to blend the repair in
Step-by-Step: Fixing a Veneer Bubble
1. Test with Heat First
Before you cut into anything, try heat. It costs you nothing and doesn’t touch the finish at all. Lay a damp cloth over the bubble and press a warm (not hot) iron on medium-low for 10 to 15 seconds. That’s often enough to soften old hide glue so it re-bonds once pressed flat. Lift the cloth and check frequently. Teak finishes scorch faster than you’d think.
2. If Heat Alone Doesn’t Work, Inject Glue
When heat doesn’t flatten the bubble, move on to a direct glue injection:
- Cut a tiny slit right along an existing grain line with a sharp craft knife. Teak’s grain pattern is busy enough that this cut practically disappears once finished.
- Lift the edge just enough, gently, to slip the syringe needle underneath the veneer.
- Inject a small amount of wood glue, then work it around with a flat tool, a dull putty knife works well, so it spreads evenly under the entire bubble, not just one corner.
- Wipe off any glue that squeezes out right away with a damp cloth. Dried glue residue is probably the single biggest cause of finish damage during this kind of repair.
3. Clamp and Cure
- Lay a sheet of wax paper over the repaired spot so your caul doesn’t stick to it.
- Set a flat wood caul on top, then clamp evenly, or just stack some heavy books on it.
- Give it a full 24 hours minimum to cure. Pulling the clamp early is the mistake almost everyone makes, and it’s the one that undoes all the careful work before it.
4. Blend the Finish
Once it’s cured and the clamp comes off, take a look at the sheen. If that spot reads a little dull next to the rest of the teak:
- Rub in a small amount of matching teak oil with a soft cloth, following the grain direction.
- Leave sanding out of it unless you truly have no choice. Teak veneer often runs just 1/32” to 1/16” thick, thinner than a couple of credit cards stacked, and it’s shockingly easy to sand straight through to the substrate underneath.
Protecting the Original Finish
A few habits that keep decades-old patina intact:
- Keep the iron on low. High heat can scorch teak oil finishes or leave them looking bleached and white.
- Try your glue squeeze-out cleanup on a hidden spot first, underneath, on the back edge, wherever won’t show.
- Don’t strip and refinish the entire tabletop just to fix one bubble. A spot repair protects value far better on a collectible mid-century piece.
- If the table carries a known designer’s name (Hans Wegner, Arne Vodder, and the like), think twice before going beyond a basic bubble fix yourself. A professional conservator is worth the cost here, since originality can swing resale value quite a bit.
When to Call a Professional
Seeing several bubbles at once, veneer that’s actually cracking, or a water-damaged section that’s lifted across a wide area? Call a restorer. Teak veneer work on valuable mid-century furniture is its own specialty, and the wrong glue or too much clamping pressure can leave visible witness lines in the wood. Those are a lot harder to undo than the original bubble ever was.
Conclusion
You don’t need to strip and refinish an entire tabletop just because of one stubborn bubble. A little heat, a careful glue injection, patient clamping, and a light pass of oil at the end, that’s usually all it takes to get a smooth surface back while keeping the original finish and patina that make these pieces worth having in the first place. Patience and a steady hand do more here than any power tool ever could. The best repair is the one nobody ever notices.